
The second in a series of articles on period patinas focuses on replicating an early 1900s frame originally created for Taos school of art founder E. Irving Couse.

.
The legend of the founding of New Mexico’s premier art colony has developed over the decades on the basis of sketchy details. Bound from Denver for Mexico on an extended painting and camping expedition in the summer of 1898, Ernest Blumenschein and Bert Phillips suffered a broken carriage wheel in the rugged mountain country of northern New Mexico. Recalling tales of Taos told in Paris by their friend Joseph Sharp, the painters determined to seek a blacksmith’s help in that small village, twenty-plus miles away. Thus it was that on the fourth day of September, Blumenschein, wheel to the shoulder, found himself silent upon a peak in Taos, gazing with Columbian awe at a new world that far surpassed the “dim picture…made in imagination from Sharp’s slight description. The morning was sparkling and stimulating,” he recalled.
— From Art in New Mexico, 1900-1945, Paths to Taos and Santa Fe by Charles E. Eldredge, Julie Schimmel, and William H. Truettner
This is a truly American story about the time when a group of artists moved into a small mountain village in New Mexico called Taos. Among them were Joseph Sharp, Victor Higgins, E. Irving Couse, Oscar Berninghaus, Ernest Blumenschein, and many others. They came from different places in the world, from Russia, New York, Paris, and elsewhere, and found a “true light” to paint by. They became known as the Taos Founders or the Taos Society of
Artists. They painted what they found around them, local Indians and pueblos, fabulous never-ending landscapes, and vistas of northern New Mexico.
Because of where they were, it was a bit difficult to get picture frames. They were known to purchase standard as well as custom-sized frames from Newcomb Macklin in Chicago when they had the money. They were also known to carve, metal leaf, or paint their own designs into standard mouldings locally available. There was
eventually one local frame shop that could carve (perhaps “adze” is more accurate) and metal leaf mouldings of their own simple designs. This was the Woosley Brothers Frame Shop.
One of the best-known artists of this group was Irving Couse. He was so influenced by the local Indians and their culture that he used much of their iconology in his artwork as well as in his original frame designs. His carving, however, was not up to his design excellence, so he sent his designs off to a wonderful carver and gilder in New York City by the name of Henry Schultheis. Schultheis would interpret the designs of birds, arrows, and acorns onto one of two mouldings he had run specifically for Couse. One was a cove profile, and the other was a reverse.
One of our specialties at Goldleaf Framemakers is replicating those particular styles of Taos School frames. The patina is only found on these strange carves. Most were produced in metal leaf or bronze paint, also called Roman gilding. But the ones gilded in 22k or 18k are the greatest.
The discovery of this school changed my entire out-look on framemaking as a whole. I had always looked at classical carving and framemaking with a European eye as was taught to me in Manhattan. This is the approach covered with Modigliani frame in “The Perfect Patina” in the August issue of PFM. I learned later of the provincial type of carve and patina on the Taos frames. These artisans worked alone and were not of a production state of mind. This provincial attitude was replicated by some large companies of that era, but they were never able to get the uniqueness of a Schultheis frame made for Couse. I have been very lucky to be asked to reproduce those period frames for my clients.
A Perfect Taos Frame
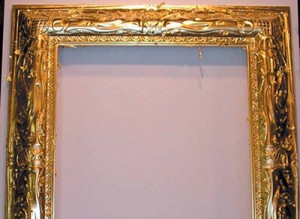
The story of this great Couse frame began one sunny July morning here in Santa Fe. Ginny Couse, grand-daughter of Irving Couse, came into my shop and literally dragged me to one of our local galleries. On the way, she explained that not only was she in possession of “The Eagles” 1913, but the original frame was also still on it. Seeing one or the other is not that uncommon, but seeing them together in their original state could be very educational.

As a result, I had a chance to study the carving techniques and how they related to the art. I also studied the subtlety of the surface in between the carves and the actual depth of the carves. To say the least, I have seen many original frames but rarely are they in such pristine condition. I proceeded to measure it and took photos of it from all sides. Back at the shop, I ran a new moulding for it.
Creating the Right Patina
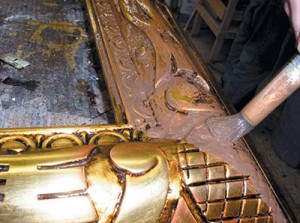
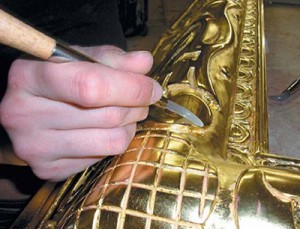
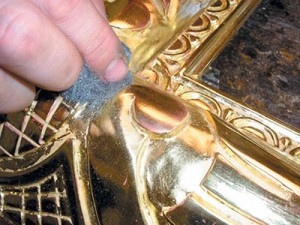
As I stated in my last article, patina starts at the wood and moves forward through all the steps in making a picture frame. If you start wrong, there is no way the patina on the finished frame will be completely believable. Remember: “Is it real or is it a replication?” After we proceeded to replicate the carve and the adzed surfaces between the different elements, next came the gesso clay and the gilding and burnishing. To do this finish right, I used the basic yellow clay base and added red clay highlights—but only on the very tops of the carved area. After burnishing, just those tips were rubbed very lightly. This is one “busy” frame, so to rub it too much would make the carves jump all over the surface. There was no rub on the original frame by Schultheis; it just appeared on the original naturally over time. He did, however, seal the frame with shellac and tone it with some sort of oil base paint. It looked like Japan paint. This frame also lived in a cold climate, because there was creosote in the nooks and crannies of the carves that came from the smoke of a fireplace or possibly a wood-burning stove.
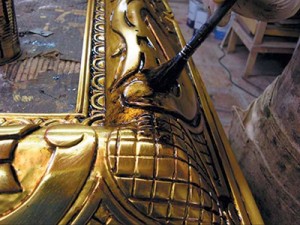
To get the look of the original shellac, we mixed amber and clear shellac and misted it unevenly all over the surface, making the surface warmer and/or cooler in different areas. Then asphaltum was added. I like to use that on my Spanish frames to get that old creosote look. You have to be careful with it, though. Too much can make a frame look greasy. It must be put on and taken off. Leave just enough on so that it looks like it was living in a room with a fireplace for over 75 years.
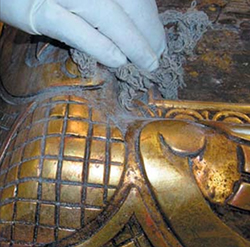
Next comes the wash. A kind of a mix of Italian and Spanish wash was used—raw umber, burnt umber, and a touch of white casein paint. Again, it should be put on and taken off. The one common thing omitted from this patina was distressing. The original was pristine, and so is the replica! Next came waxing and dusting. I used a green wax—a mixture of raw umber, artist’s pigment, and paste wax. The dust is, well, cigarette ash. Remember, go easy on the dust. You don’t want the frame to look like you put the dust on it; you want it to look like it accumulated over time.
My time is up and I must admit, I’m a little dusty too.